Friday, February 5, 2010

Valentines: Part 1 (Heart-shaped crayons)

We had fun making heart-shaped crayons to use for Valentines for Amelia's class. This was a good project to work on with her since she was able to help peel off the paper and break up the crayons.


Step 1: Gather your old crayons and peel off the paper. Break them up into small pieces.


Step 2: Lightly grease a heart-shaped pan and fill each cup with crayon pieces in any color combination you like.


Step 3: Bake at 250 until melted, about 8 to 10 minutes. (You might want to put a baking sheet underneath to catch any possible drips.)


Step 4: Once they have cooled, pop them out and check out the fun colors!


I also tried cutting up the crayons with a knife to get even smaller pieces and put lots of different colors together. The results were very fun.


Next up: Attaching the crayons to cards...

Wednesday, February 3, 2010

Snow Day Foods

We had another snowy weekend. It put me in the mood for making and eating soup and warm bread. I decided to try making some artisan bread and my mom's white chicken chili.

I have tried a few different white chicken chili recipes but I really like my mom's recipe the best. Actually, it's not really her recipe. She found it on the internet but she won the church chili cook-off with it so I'm just going to refer to it as hers from now on. (Seems like the white chicken chili recipes are always winning these days.)

It just has the right flavor and the right amount of spice.


White Chicken Chili

16 oz or so of canned white beans

1 large onion, chopped

1 stick unsalted butter

1/4 c all-purpose flour

3/4 c chicken broth

2 cups half and half

1 tsp Tabasco

1 1/2 teaspoons chili powder

2 tsp ground cumin
1 teaspoon salt
1 teaspoon pepper
1 4-oz can whole mild green chilies, drained and chopped

3 boneless, skinless chiken breasts

1 1/2 c grated Monterey Jack
 (my mom uses Pepper Jack)
1/2 c sour cream

DIRECTIONS:
1. Heat a large skillet over moderately high heat and put in some butter and oil. Meanwhile coat your chicken with salt and pepper and maybe some chili powder. Throw them in the skillet and resist the urge to turn them over. Leave them for five minutes, or until nicely browned, then flip them. Leave it there until browned and then flip them every few minutes until they are done (which you can tell by poking a knife into the thickest part and seeing if it's white instead of pink).
2. Remove the chicken from the pan. When the chicken is cool enough to handle, shred it with your fingers and set aside.
3. While waiting for chicken to cool, cook the onion in the same pan with 2 Tbs of butter until softened.
4. In a heavy pot, large enough to hold all the ingredients, melt remaining 6 Tbs of butter over moderately low heat and whisk in flour. Cook the roux, whisking constantly, for three minutes. Stir in the onion and gradually add the broth and half and half, whisking the whole time. Bring mixture to a boil and simmer, stirring occasionally, 5 minutes, or until thickened. (It will be nicely and obviously thick.) Stir in Tabasco, chili powder, cumin, salt and pepper (adjust quantities for your own liking). Add beans, chilies, chicken and cheese, and cook over moderately low heat, stirring occasionally for 20 minutes. Add sour cream. May be served immediately -- although it tastes awesome the next day.


Artisan Bread

The artisan bread recipe came from this website. The idea is to make a big batch of dough and then you can store it in your fridge for 2 weeks and just pull out a chunk whenever you want to make a loaf. You shape it, leave it on the counter for about an hour, and then bake it for 30 minutes. The key is to bake the bread with a pan of steaming water underneath which gives the bread its nice crusty outside and soft inside.

Here are the loaves I've baked so far. I think I can get at least 2 more loaves out of the batch over the next week.


Sunday, January 31, 2010

Betty Crocker was right.

I spent the weekend experimenting with chocolate chip cookie recipes. Whenever I use real butter, which the experts always say to use, my cookies flatten out. So I decided to try a recipe with butter, and then the same recipe using margarine and see what happened. People are always claiming to have found the perfect recipe, like this one at allrecipes.com. (Now, the perfect recipe really depends on your own personal tastes. I happen to like my chocolate chip cookies soft and chewy.)

Over 3,000 people have rated this particular recipe, each with a different opinion. And over 400 photos have been uploaded, each looking VERY different. Clearly, not everyone is doing the same thing. It's impossible to know what works best when the comments are so varied: eggs MUST be at room temperature, bake at 335 not 325, refrigerate for 24 hours, refrigerate exactly 36 hours, don't add any extra flour, be sure to add extra flour, bake at 375, melt butter, don't melt butter, add less sugar, etc.

I have to say, the batch I made using butter spread a lot more than the batch with margarine. Note the difference:


The butter batch. Tasty, but too flat.
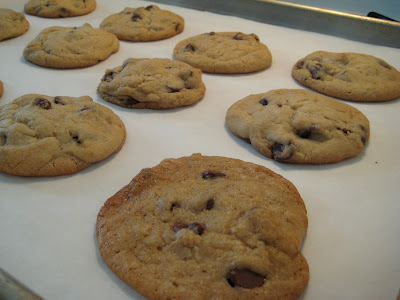

The margarine batch, with one butter cookie for comparison. Getting better...

But I still wasn't pleased with the results. Then I realized that I needed to return to the classics: Betty Crocker and shortening. Shortening got a bad reputation with that whole trans fat thing, but they now make it without the trans fat. Now I'm no food scientist (although my dad is) but I would say that butter, margarine, and shortening are all bad for us in some way and should all be used in moderation (hopefully consuming 6 warm cookies from the oven is moderation?) and I'm never setting out to be healthy when baking.

So I broke out my old Betty Crocker cookie recipe. When I was a kid, I made chocolate chip cookies ALL the time. And I used this Betty Crocker recipe which calls for half shortening and half butter (I used margarine...we never had such extravagances as butter when I was a kid). My cookies always turned out perfectly. (Except the time when I was 8 or 9 and made them by myself for the first time and used salt in place of sugar.) Why I have been trying other recipes over the years I'm not sure.

Perfection:


Round, soft, and chewy.


And delicious.


Don't forget the milk.

So here it is. My perfect chocolate chip cookie recipe (altered slightly from Betty Crocker). However, there is a good chance that this won't be YOUR perfect recipe.

Chocolate Chip Cookies
(Betty Crocker, my changes are in red)

• 2/3 cup shortening (I used butter flavored Crisco)
• 2/3 cup butter or margarine (I used butter)
• 1 cup sugar
• 1 cup brown sugar, packed
• 2 large eggs
• 2 teaspoons vanilla (I double the vanilla)
• 3 cups flour
• 1 teaspoon baking soda
• 1 teaspoon salt
• 1 (12 ounce) package chocolate chips

Directions:

Cream shortening, butter, and sugars in large mixing bowl; blend in eggs and vanilla.
Combine dry ingredients and add to butter mixture. Mix until well blended.
Stir in chocolate chips. (And no need to refrigerate this dough...because really, who wants to wait for that anyway?)
Drop by rounded teaspoon onto ungreased baking sheets. (I like parchment paper.)
Bake at 375° for 7-10 minutes until golden brown. (I bake at 350°)

Note: For a softer, rounder cookie add 1/2 cup flour. (Definitely add the extra flour...makes a rounder cookie, but doesn't make it too cakey.)

I usually half the recipe and it makes about 2 dozen cookies.

Monday, January 4, 2010

Top 100 Tutorials

Time to get busy. The Top 100 Tutorials of 2009 is out. Now to narrow the selection...

Saturday, January 2, 2010

Homemade Pendants

A few years ago, Ben gave me some wooden tile pendants that he got on Etsy and I have loved them. I finally decided to try and make some as gifts for Christmas this year. You can order all the supplies you need on Etsy (I did some glass and some with scrabble tiles) or you can get some things at the craft store. There are already a lot of tutorials online for making these...you can find one here.


I made little personalized tins to hold each set of pendants:

Wednesday, December 23, 2009

Nativity Costumes

Ben comes from a large family and they always draw names each Christmas for gift-giving. This year we needed a gift for his brother's family and I saw this fun idea at Design Mom to make a set of nativity costumes that they could use for acting out the nativity on Christmas Eve.

We had so much fun as a family putting these costumes together. We started at the thrift store and found clothes and fabric that would work and searched through all the crazy trinkets to find gold, frankincense, and myrrh. I bought more fabric at a fabric store and made a few costumes (my mom made the angel costume when she was here for Thanksgiving). We made a variety of sizes so hopefully they will last through the years.


All packaged up and ready to go:


Amelia had fun modeling the costumes:


Thursday, December 10, 2009

Matchbox Advent Calendar

I could not stop myself from making this adorable little matchbox advent I saw here. It takes about 30 minutes to make and all you need are matchboxes and some wrapping paper or scrapbook paper. I stamped the numbers with a date stamp (the kind you get at an office supply store). Use a hot glue gun to glue the rows of boxes together, then wrap each row in paper and glue them on top of each other. Add a fun little "tree topper" and hide a surprise in each box.


Andes Mints are the perfect size to hide in each little box.