Wednesday, April 13, 2011

Moving...

I am abandoning this blog and combining all of my crafting/designing endeavors with my family blog at a new address:

www.dconawhim.blogspot.com

Sunday, February 13, 2011

Valentine Scratch Cards

We had a lot of fun making the Valentine scratch cards that I saw here. They are really easy to make and we're already scheming about lots of other non-Valentine uses for scratch cards.


Thursday, January 20, 2011

Testing America's Test Kitchen

There is something about January that makes me want to eat chocolate chip cookies nonstop. Last January I tried several recipe variations and posted the results.

I love watching America's Test Kitchen. The other night they were testing chocolate chip cookie recipes. I decided to try out their recipe and it was delicious. I love hearing the explanations of why ingredients and methods do what they do. And I love that my cookies turned out exactly like the ones they made on the show. They still flattened out quite a bit, but that's the sacrifice you make for butter. Their winning recipe and method took a little extra time. They browned their butter (always a good thing) and then waited 10 minutes to really let the sugars dissolve. They turned out just slightly crispy on the edges and extra chewy on the inside. I also used their recommended chocolate chip, Ghirardelli bittersweet chocolate chips.


(These photos were taken right out of the oven. They flattened a little more.)

Go here to see the full recipe with explanations.

Perfect Chocolate Chip Cookies
Ingredients
  • 1 3/4 cups unbleached all-purpose flour (8 3/4 ounces)
  • 1/2 teaspoon baking soda
  • 14 tablespoons unsalted butter (1 3/4 sticks)
  • 1/2 cup granulated sugar (3 1/2 ounces)
  • 3/4 cups packed dark brown sugar (5 1/4 ounces) (see note)
  • 1 teaspoon table salt
  • 2 teaspoons vanilla extract
  • 1 large egg
  • 1 large egg yolk
  • 1 1/4 cups semisweet chocolate chips or chunks (see note)
  • 3/4 cup chopped pecans or walnuts, toasted (optional)
Instructions
  • 1. Adjust oven rack to middle position and heat oven to 375 degrees. Line 2 large (18- by 12-inch) baking sheets with parchment paper. Whisk flour and baking soda together in medium bowl; set aside.
  • 2. Heat 10 tablespoons butter in 10-inch skillet over medium-high heat until melted, about 2 minutes. Continue cooking, swirling pan constantly until butter is dark golden brown and has nutty aroma, 1 to 3 minutes. Remove skillet from heat and, using heatproof spatula, transfer browned butter to large heatproof bowl. Stir remaining 4 tablespoons butter into hot butter until completely melted.
  • 3. Add both sugars, salt, and vanilla to bowl with butter and whisk until fully incorporated. Add egg and yolk and whisk until mixture is smooth with no sugar lumps remaining, about 30 seconds. Let mixture stand 3 minutes, then whisk for 30 seconds. Repeat process of resting and whisking 2 more times until mixture is thick, smooth, and shiny. Using rubber spatula or wooden spoon, stir in flour mixture until just combined, about 1 minute. Stir in chocolate chips and nuts (if using), giving dough final stir to ensure no flour pockets remain.
  • 4. Divide dough into 16 portions, each about 3 tablespoons (or use #24 cookie scoop). Arrange 2 inches apart on prepared baking sheets, 8 dough balls per sheet. (Smaller baking sheets can be used, but will require 3 batches.)
  • 5. Bake cookies 1 tray at a time until cookies are golden brown and still puffy, and edges have begun to set but centers are still soft, 10 to 14 minutes, rotating baking sheet halfway through baking. Transfer baking sheet to wire rack; cool cookies completely before serving.

Saturday, January 15, 2011

Going Gray

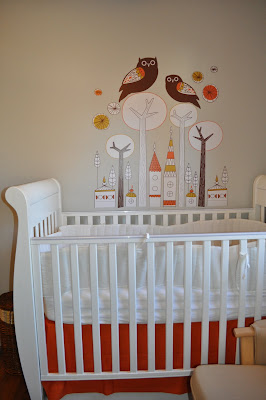
We decided to redecorate the nursery in preparation for the birth of our first boy a few months ago. It had been yellow and green since our first daughter was born five years ago and we were ready for a change. We are really happy with the gray wall color we ended up with and now I'm wanting it in my living room.

I really wanted to do gray and orange and wasn't sure how it was going to come together, but I'm happy with the result.

I bought an extra set of orange curtains and my mom made a crib skirt out of one panel (the other one makes an excellent table cloth). The fabulous vinyl wall art is from blik. We used blik for the girls' room as well.

The pictures don't quite do the colors justice, but you get the idea.

BEFORE:


AFTER:


BEFORE:


AFTER:


BEFORE:


AFTER:


Tuesday, December 21, 2010

Screen Printing: Coasters

For our Christmas gifts to neighbors this year, I wanted to screen print something. I'm always looking for an excuse to produce something in mass quantities so I can make good use of a screen. I came up with four Christmas designs for the screen and decided to print them on coasters. I also found little bags to print on and then put the coasters in the bag and attached them to a bottle of sparkling cider. I made tags that had the same designs on them.

There is something so satisfying about removing the screen and seeing the printed result.


Sunday, December 19, 2010

Matchbox Garland Advent

My second advent creation this year was a re-creation of a matchbox advent I saw on Etsy. Instead of covering the matchboxes with scrapbook paper and wrapping paper, I used vintage Christmas images and added numbers in Photoshop. Then I used mod podge to attach them. The front of the matchboxes has the numbers and each day you turn one over and they slowly spell out "Merry Christmas!"

After a trial garland with buttons that turned out to be too small and making one as a gift and one for myself, I ended up sewing 75 buttons. I'm done sewing buttons for a while.


The kids love pulling out candy each day.

Thursday, December 16, 2010

Muffin Tin Advent

If you've ever been to my house at Christmas time, you would know that I'm a little obsessed with advent calendars. As a kid, we did a lot of different things to count down the days to Christmas...advent calendar, burned down candles each night, paper chain with daily activities, etc. and I always loved the excitement that built throughout the month. Perhaps that inspired my love of advents.

I have an ever growing list of advent calendars that I have seen on different design blogs that I want to create. In November I made two different advents. Here is my version of the mini muffin tin advent.


I used vintage images and backgrounds to create the round magnets that cover up the holes. I created everything in Photoshop and then printed them on magnet paper.

Hiding inside each hole is a bottle cap magnet with a number:


I always like visual reminders of the countdown so each day you remove a number and place it on the outside:


Then bake some mini muffins!

I made one for each of my siblings. Now I just need to make one for myself...